Open the dialer app and type *#07#
Friday, September 22, 2023

How to Mirror the Screen of an Android Smartphone to a Linux PC
- On the smartphone, set developer options on
- On the Linux PC, install scrcpy (sudo snap install scrcpy on Ubuntu)
- Connect the smartphone to the PC via a USB cable then open a terminal session on the PC and type scrcpy
Monday, January 30, 2023
MacIntosh Classic Analog Board Recap
This post focuses on replacing the capacitors on the international version of the Macintosh Classic analog board 630-0525 Rev B 240V.
The figure below shows the capacitors to be replaced and their positioning on the analog board. For a more detailed picture, follow this link. Here, you'll find both the codes and values of the capacitors.

The following table lists all capacitors with their value.
Here, you find a list grouped by capacitor type.
Hope this helps.
Sunday, March 29, 2020
Vivaldi Browser - How to get saved passwords
For those who don't know Vivaldi, it is a browser based on Chromium. I personally use it instead of Chrome because I love its interface much more customizable than Chrome as well as its attention to privacy and security.

Although I use to let the browser save my credentials for accessing web sites, sometimes I need to get them back. Here comes the problem: how to find saved passwords in Vivaldi?

You may notice two things:


Although I use to let the browser save my credentials for accessing web sites, sometimes I need to get them back. Here comes the problem: how to find saved passwords in Vivaldi?
1) Type: chrome://settings/search#password into address bar
I'm not kidding. I know, we are in Vivaldi and not in Chrome, but trust me: type exactly chrome://settings/search#password into address bar. Vivaldi then will open a window similar to this one:
You may notice two things:
- The window presents a vertical scroll bar and it shows the very end of the Settings page.
- Vivaldi converts the chrome://settings/search#password URL into vivaldi://settings/search#password, but if you type this latter URL another page will be shown.
2) Scroll to the very beginning of the Settings page

At the very beginning of the Settings page there is a Passwords section. Now press on the right arrow corresponding to that section and... voilà! Saved Passwords appear.

Now you are almost done. Just click on the eye icon.
Vivaldi will prompt you for your OS user credentials. Upon right completion of this check, Vivaldi will then unlock the password that corresponds to the eye icon you pressed before and you'll see it in clear.
Sunday, January 20, 2019
TENMA 72-10165 Drivers Installation on Windows 10
TENMA 72-1065 is a PC-based oscilloscope, i.e. an oscilloscope that uses the PC for displaying signals. It comes with a mini CD ROM that contains Windows software: device drivers and a program to visualize data acquired through the device.
Although it's still sold nowadays, its bundling software comes from the past, clearly before the advent of Windows 10. That means that installing its device drivers on Windows 10 is not straightforward and is quite far from trivial. Here I'll explain how I managed to install them on the Windows 10 - based PC of my lab.
I'll start assuming that you already have the mini CD ROM with the software. If not, here I'll provide for you.
The first step is to execute the program "Setup.EXE" that comes with the bundle. This will install all the software for interacting with the oscilloscope but the device drivers. As a proof, after installing it, try to connect the oscilloscope and display some signals. You will end up with a message like: "Instrument not found. Possible causes are: driver is not found; instrument not connected to USB".

It turns out that the device drivers have not been installed.
The problem is Windows 10 contains a feature called "driver signature enforcement," i.e. it requires device drivers to be signed by the manufacturer.
Here, the manufacturer, TENMA, doesn't provide any driver signature, so... what?
The alternative for having signed drivers is to turn off the driver signature enforcement feature in Windows 10. Just follow these steps.


T72-10165 is not properly recognized and it appears under Other devices.
Right click on T72-10165 and choose "Update Driver Software".

Although it's still sold nowadays, its bundling software comes from the past, clearly before the advent of Windows 10. That means that installing its device drivers on Windows 10 is not straightforward and is quite far from trivial. Here I'll explain how I managed to install them on the Windows 10 - based PC of my lab.
I'll start assuming that you already have the mini CD ROM with the software. If not, here I'll provide for you.
The first step is to execute the program "Setup.EXE" that comes with the bundle. This will install all the software for interacting with the oscilloscope but the device drivers. As a proof, after installing it, try to connect the oscilloscope and display some signals. You will end up with a message like: "Instrument not found. Possible causes are: driver is not found; instrument not connected to USB".

It turns out that the device drivers have not been installed.
The problem is Windows 10 contains a feature called "driver signature enforcement," i.e. it requires device drivers to be signed by the manufacturer.
Here, the manufacturer, TENMA, doesn't provide any driver signature, so... what?
The alternative for having signed drivers is to turn off the driver signature enforcement feature in Windows 10. Just follow these steps.
1) Restart Windows 10 in safe mode
Shift + Click on Restart
2) Choose the option Troubleshoot

3) Choose Advanced options

4) Choose Startup Settings

5) Click on Restart

6) At restart, press 7 to disable driver signature enforcement
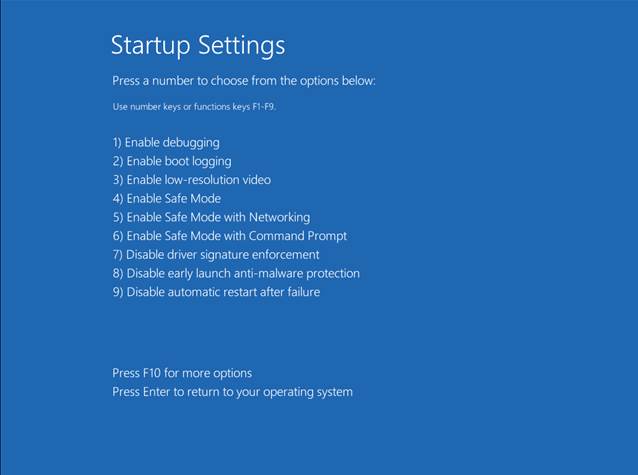
7) Update driver software
Now you are in Windows 10. Open the "Computer Management" window (you can do it either by searching Computer Management or by running compmgmt.msc in run window). Chances are you will face a situation like the following:

Right click on T72-10165 and choose "Update Driver Software".

Then select "Browse my computer for driver software". Now navigate to the folder "Driver" on the mini CD ROM.
8) Restart
The oscilloscope's device drivers have now been installed.
Tuesday, February 14, 2017
Troubleshooting Apple ITunes Update on Microsoft Windows
ITunes update on my Windows 7 PC. It had to be a trivial task... at least in theory. The only thing to do was just double clicking on the newest version of ITunes installer I downloaded before and waiting until it finished its job. You know, sometimes the reality goes beyond any imagination.
 During the installation I got this error and as a result the entire update aborted.
"There is a problem with this Windows Installer package. A program required for this install to complete could not be run. Contact your support personnel or package vendor".
Apple, aka the inventor of user friendliness, was telling me something cryptic: "a program required for this install to complete could not be run". Now, my first question was: which program? But no info was given about.
Dear Apple, sometimes I guess you deliver these riddles to Windows users in the hope to converting them to your platform, where everything is wonderful and these error messages do non exist just because all is working like a charm. Well... I like riddles.
So, after an entire week-end spent on it, I discovered the solution. Which program caused this error message? Apple Software Update. It was missing or not properly installed on my PC.
These are the steps to follow for solving the error and to install ITunes correctly.
From Add or remove programs panel uninstall these programs in this exact sequence.

"There is a problem with this Windows Installer package. A program required for this install to complete could not be run. Contact your support personnel or package vendor".
Apple, aka the inventor of user friendliness, was telling me something cryptic: "a program required for this install to complete could not be run". Now, my first question was: which program? But no info was given about.
Dear Apple, sometimes I guess you deliver these riddles to Windows users in the hope to converting them to your platform, where everything is wonderful and these error messages do non exist just because all is working like a charm. Well... I like riddles.
So, after an entire week-end spent on it, I discovered the solution. Which program caused this error message? Apple Software Update. It was missing or not properly installed on my PC.
These are the steps to follow for solving the error and to install ITunes correctly.
From Add or remove programs panel uninstall these programs in this exact sequence.
- ITunes
- Apple Software Update (if not present, just skip this step)
- Apple Mobile Service Support
- Bonjour
- Apple Application Support (32 bit)
- Apple Application Support (64 bit)
Now install ITunes.
If the error still appears, open Add or remove programs panel. Right click on Apple Software Update (now it has to be present) and choose repair.
Run the ITunes installer again. Now it should complete with no errors.
Hope this help.
Wednesday, September 30, 2015
Back to Samsung Firmware - part 2
It's time to get the root access. This operation can be accomplished in two steps.
- Install a CWM (ClockWordMod) recovery
- Install a zip file that allows to gain root access
The first step is needed because there's no way to install a zipped program into the phone without having a CWM recovery installed. Specifically, we will install the PhilZ kernel (for more info check this out).
Ok. Let's start.
Ok. Let's start.
- Download PhilZ kernel.
- Be sure the phone is switched off.
- Start it and press simultaneously VOLUME UP + HOME + POWER keys
- Follow the instructions on the phone
- Start Odin
- Connect the phone to PC via USB cable
- Click on the AP button in Odin window and load PhilZ kernel
- Click on Start button. The transfer begins.
When the procedure terminates, the phone restarts. Now you will notice a yellow triangle just under the phone name. It indicates the phone kernel has been altered someway. Don't worry about it: it's possible to get rid of it. We will do it later, For the moment just forget about it.
Saturday, May 23, 2015
Back to Samsung Firmware
Oops I did it. I mean, I installed CyanogenMod on my Samsung Galaxy S2.
It's 01:05 AM now. Phone charge is about 68%. Time to install Samsung Firmware back. We will use a PC with Odin already installed and Samsung firmware file already in there.
After a week spent with it, I can say for sure that the only thing I really appreciated is the new version of Android OS (Kitkat, so Android 4.4.4, instead of Samsung's 4.1.2) . All the rest sucks (sorry!).
This is my list of major compliances:
- Not energy efficient. A battery charge last at maximum half a day
- Unstable. It reboots at least once a day
- Ther's not an FM radio and I cannot live without http://www.modenaradiocity.it/
That's enough for me. Time to come back to Samsung Firmware: yes I will reinstall Samsung Firmware, obtain root access and remove all the unnecessary Samsung apps that only last memory.
It's 12:00 AM. Let's start.
As a first step let's do a Nandroid backup. It's easy to do it starting with an already installed CyanogenMod ROM. In fact CyanogenMod comes with a CWM-based Recovery that makes it easy to do a full, Nandroid backup.
It's 12:00 AM. Let's start.
As a first step let's do a Nandroid backup. It's easy to do it starting with an already installed CyanogenMod ROM. In fact CyanogenMod comes with a CWM-based Recovery that makes it easy to do a full, Nandroid backup.
- Turn off the phone
- Enter recovery mode: with the phone still off, press simultaneously VOLUME UP + HOME + POWER keys
- The device will start in recovery mode
- Select backup and restore (use VOLUME UP / VOLUME DOWN keys for moving through the menu items and use POWER key for selecting an item)
- Choose either backup to /storage/sdcard0 or /storage/sdcard1
- After about 15 mins, the procedure finished. My God! I started with a 65% of battery charge and now it's about 10%!!! Anyway, I chose to backup onto sdcard0, therefore the procedure created some subdirs for me, specifically: clockworkmod/backup and another directory labeled with today's datetime. Inside that directory the procedure saved all the stuff.
It's 12:20 AM. My phone is charging now. I need to reach about the 60% of the full charge for completing the next step. So, let's pause for a while and have some rest/fun with other activities.
It's 01:05 AM now. Phone charge is about 68%. Time to install Samsung Firmware back. We will use a PC with Odin already installed and Samsung firmware file already in there.
- Connect the phone (still swiched off) to PC using a USB cable
- Start Odin and load the original Samsung Firmware by clicking on AP button and selecting the corresponding firmware file
- Start the phone keeping VOLUME UP + HOME + POWER keys pressed
- Follow the instruction on the phone
- Click Start button from Odin window
- At the end of procedure the phone will install the Samsung Firmware and will boot.
- If the phone keep restarting again and again without finishing the boot procedure, a hard reset is needed. In order to do this, switch off the phone. Then press VOLUME UP + HOME + POWER keys. The device will start in recovery mode. Select the item wipe data / factory reset and reboot.
It's 02:50 AM now. Samsung Firmware is working, but I haven't finished yet. I want to get rid of all the junk Samsung app that are pre-installed by the vendor. Ok. Time to root the phone.
Sunday, March 17, 2013
From one monolithic log files to many, more manageable, smaller logs
... Then they came to me for interpreting the n-th log file: it was an intricate mess of thread traces. When I went home I wrote an utility for splitting that mess into several files each one with a single thread trace.
Welcome to my log-splitter
Welcome to my log-splitter
Tuesday, January 08, 2013
Reading Android SDK doc offline - I want to build my app - day 3
The ADT bundle doesn't install documentation by default, therefore the only way to read it is by using a internet connection. Here I'll describe how to acquire that documentation for reading it locally.
First off, be sure to launch your Eclipse IDE as computer administrator. (The details about how to do that are a little bit OT here, anyway... if you start Eclipse using a shortcut in Windows 7, be sure that, after opening its property, the item Run this program as an administrator is checked on under the tab Compatibility).
Now open your Eclipse IDE, then from Windows menu, choose the item Android SDK Manager. A window similar to the one in figure will open up.

Here you can see what already has been installed locally and what still hasn't. Check the item Documentation for Android SDK then click on Install button.
After installing the documentation, you can browse it under docs folder, located into SDK root folder. The entry point is the file offline.html.
First off, be sure to launch your Eclipse IDE as computer administrator. (The details about how to do that are a little bit OT here, anyway... if you start Eclipse using a shortcut in Windows 7, be sure that, after opening its property, the item Run this program as an administrator is checked on under the tab Compatibility).
Now open your Eclipse IDE, then from Windows menu, choose the item Android SDK Manager. A window similar to the one in figure will open up.

Here you can see what already has been installed locally and what still hasn't. Check the item Documentation for Android SDK then click on Install button.
After installing the documentation, you can browse it under docs folder, located into SDK root folder. The entry point is the file offline.html.
What kind of Java am I using? - I want to build my app - day 3
Monday, January 07, 2013
Time to study and to experiment - I want to build my app - day 2
This is day 2 of my experience in building my own Android app.
I downloaded the whole ADT bundle for Windows here and I installed it.
Then I started my training by chapter one, Building Your First App, that's basically an Hello World app.
This is a quite easy app to develop that shows you some basic concepts behind Android development: the Activity class, the View class and the Intent class. Beside that, it helps you familiarize with the emulator and its usage for building, running and debugging apps.
My impression now is... there is a lot of things to study and the complexity is high because the field is huge and this platform suffers fragmentation: I mean you cannot rely on the fact your app will run on Jelly Beans only (at least for my app). Therefore some APIs cannot be used generally and you have to learn way A as well B to do just the same thing.
Before continuing my training, I discovered a site where Open Source Android app are listed: it can be useful for doing some practice by studying already-skilled-programmers' code. Here it is: F-Droid. This site, as well as the SDK samples, can help a lot. (Practice makes perfect).
I downloaded the whole ADT bundle for Windows here and I installed it.
Then I started my training by chapter one, Building Your First App, that's basically an Hello World app.
This is a quite easy app to develop that shows you some basic concepts behind Android development: the Activity class, the View class and the Intent class. Beside that, it helps you familiarize with the emulator and its usage for building, running and debugging apps.
My impression now is... there is a lot of things to study and the complexity is high because the field is huge and this platform suffers fragmentation: I mean you cannot rely on the fact your app will run on Jelly Beans only (at least for my app). Therefore some APIs cannot be used generally and you have to learn way A as well B to do just the same thing.
Before continuing my training, I discovered a site where Open Source Android app are listed: it can be useful for doing some practice by studying already-skilled-programmers' code. Here it is: F-Droid. This site, as well as the SDK samples, can help a lot. (Practice makes perfect).
Saturday, December 22, 2012
Disappointment with tablet screen protectors
It was the third screen protector I tried to apply to my 7 inches Android tablet. I ended up thinking that is nearly impossible to apply a screen protector on a tablet surface without introducing some air bubble or dust.
So, now, I give up. My Android tablet will never have any of these gadgets.
After this (frustrating) experience my conclusion is: screen protectors are easily appliable only on small screen sizes, i.e. on mobile phones, otherwise... forget about them.
So, now, I give up. My Android tablet will never have any of these gadgets.
After this (frustrating) experience my conclusion is: screen protectors are easily appliable only on small screen sizes, i.e. on mobile phones, otherwise... forget about them.
I want to build my app - day 1
Welcome back.
I see my last blog entry here is dated September 2010... a lot of time ago.
Don't worry for me: I'm alive and well. I still work on Java, I do a lot of photos and enjoy life.
Starting from today, I'd like to bring some new air here, at least I promised that to myself: I want to seriously build some apps.
I own an Android 4.1 phone and an Android 4.2 tablet and I already told to myself countless times this year to develop some ideas, but I'm still fighting against less or no time at all, so the challenge here is to find out some good time to put words into action.
Today is day one for this project. I will post here my progress on a regular basis labeling each entry with the keyword myapp.
I see my last blog entry here is dated September 2010... a lot of time ago.
Don't worry for me: I'm alive and well. I still work on Java, I do a lot of photos and enjoy life.
Starting from today, I'd like to bring some new air here, at least I promised that to myself: I want to seriously build some apps.
I own an Android 4.1 phone and an Android 4.2 tablet and I already told to myself countless times this year to develop some ideas, but I'm still fighting against less or no time at all, so the challenge here is to find out some good time to put words into action.
Today is day one for this project. I will post here my progress on a regular basis labeling each entry with the keyword myapp.
Thursday, September 16, 2010
Apache Ant - How to search a and replace regular expressions inside a text
As reported by documentation, Ant provides a task, <ReplaceRegExp>, "for replacing the occurrence of a regular expression with a substitution pattern in a selected file or set of files". Now the question is: do Ant also provide a task for doing the same on texts? Well... the answer is no.
Anyway, this doesn't mean that it's not possible to achieve the same effect on texts. Actually there are at least two ways: the first is to use AntContrib's <PropertyRegex> task. The second (that works only starting from Ant 1.7.1) is to combine some standard Ant task to do the same: just read on.
Let's start from the <concat> task. The documentation says: "Since Ant 1.7.1, this task can be used as a Resource Collection that will return exactly one resource". Moreover "since Ant 1.6 it supports nested FilterChains". This is important because FilterChains are formed also by TokenFilters and a TokenFilter can be a ReplaceRegex string filter. Confused? Take a look at the following code:
To extract the result of <concat> task, I've wrapped this task around a <tokens> task and I've assigned an id to the external task. Finally, using the expression ${toString:id} it's possible to extract the toString value from the <tokens> task: this is the result of the search and replacement. Pretty tricky, isn't it?
Now let's try it.
Anyway, this doesn't mean that it's not possible to achieve the same effect on texts. Actually there are at least two ways: the first is to use AntContrib's <PropertyRegex> task. The second (that works only starting from Ant 1.7.1) is to combine some standard Ant task to do the same: just read on.
Let's start from the <concat> task. The documentation says: "Since Ant 1.7.1, this task can be used as a Resource Collection that will return exactly one resource". Moreover "since Ant 1.6 it supports nested FilterChains". This is important because FilterChains are formed also by TokenFilters and a TokenFilter can be a ReplaceRegex string filter. Confused? Take a look at the following code:
<macrodef name="replaceStringWithRegExp">Here I've defined a macro named "replaceStringWithRegExp". It takes four input parameters:
<attribute name="string"/>
<attribute name="searchPattern"/>
<attribute name="replacementPattern"/>
<attribute name="property"/>
<sequential>
<tokens id="id">
<concat>
<string value="@{string}"/>
<filterchain>
<tokenfilter>
<replaceregex pattern="@{searchPattern}"
replace="@{replacementPattern}"
flags="g"/>
</tokenfilter>
</filterchain>
</concat>
</tokens>
<property name="@{property}" value="${toString:id}"/>
</sequential>
</macrodef>
- string: text to match against a regular expression
- searchPattern: regular expression
- replacementPattern: substitution pattern
- property: name for a new property that will contain the result of the replacement
To extract the result of <concat> task, I've wrapped this task around a <tokens> task and I've assigned an id to the external task. Finally, using the expression ${toString:id} it's possible to extract the toString value from the <tokens> task: this is the result of the search and replacement. Pretty tricky, isn't it?
Now let's try it.
<replaceStringWithRegExp string="James Bond"Here we get: "My name is Bond, James Bond". Well, it works.
searchPattern="(\w+)\s+(\w+)"
replacementPattern="My name is \2, \1 \2"
property="result"/>
<echo message="${result}"/>
Wednesday, September 15, 2010
Apache Ant - How to find empty directories
To find out empty directories just using standard Ant tasks is not a trivial job. Here I'll show you how this can be accomplished applying a technique that involves an accurate use of <copy> task and <present> selector.
Let's take a look at the following script excerpt:
The idea is to use the <copy> task to clone the directory structure into a temp dir (${java.io.tmpdir}/_copy_) without including empty directories (includeEmptyDirs="false"). This way we get a clone of the original directory structure without its empty directories.
Empty directories can now appear from the comparison between the original directory structure and the cloned one: they simply emerge as those directories that are present only in the original structure, as the <present> selector shows.
Let's take a look at the following script excerpt:
<property name="dirToCheck" value="c:/temp"/>In the previous code we want to check for empty directories starting from a base directory identified by property named "dirToCheck".
<copy todir="${java.io.tmpdir}/_copy_" includeEmptyDirs="false">
<fileset dir="${dirToCheck}"/>
</copy>
<dirset dir="${dirToCheck}" id="emptyDirs">
<present present="srconly" targetdir="${java.io.tmpdir}/_copy_"/>
</dirset>
The idea is to use the <copy> task to clone the directory structure into a temp dir (${java.io.tmpdir}/_copy_) without including empty directories (includeEmptyDirs="false"). This way we get a clone of the original directory structure without its empty directories.
Empty directories can now appear from the comparison between the original directory structure and the cloned one: they simply emerge as those directories that are present only in the original structure, as the <present> selector shows.
Tuesday, August 10, 2010
How to get Huawei E1750 USB modem working on Ubuntu Lucid
Some times ago I installed Ubuntu 10.4 LTS (aka Lucid) on my laptop. At that point I wasn't sure whether my Huawei E1750 USB modem were recognized or not by the new OS, so I plugged it into a USB port. The result was the USB modem was recognized as a mere USB drive, so no internet connection could be established.
In order to solve this problem, I discovered that I needed to install a package named "usb-modeswitch".
As the documentation says, several new USB devices have their proprietary Windows drivers onboard, especially WAN dongles. When plugged in for the first time, they act like a flash storage and start installing the driver from there. If the driver is already installed, the storage device vanishes and a new device, such as an USB modem, shows up. This is called the "ZeroCD" feature.
On Debian, this is not needed, since the driver is included as a Linux kernel module, such as "usbserial". However, the device still shows up as "usb-storage" by default. usb-modeswitch solves that issue by sending the command which actually performs the switching of the device from "usb-storage" to "usbserial".
Also I discovered that before installing "usb-modeswitch" the package "usb-modeswitch-data" must be installed.
I then downloaded these two packages using a Windows machine with a working internet connection. The URL I used were:
- http://packages.ubuntu.com/lucid/usb-modeswitch-data for usb-modeswitch-data
- http://packages.ubuntu.com/lucid/usb-modeswitch for usb-modeswich
Using a USB storage key I moved the downloaded packages on the Ubuntu machine.
Then I installed them using the following terminal commands:
sudo dpkg -i usb-modeswitch-data.deb
sudo dpkg -i usb-modeswitch.deb
sudo dpkg -i usb-modeswitch.deb
I restarted Ubuntu, connected the USB modem and now it was perfectly recognized. As a proof for this I noticed that Ubuntu's network menu (located top right) showed a new item, Mobile Broadband, with the option to connect to a mobile network.
Please note that this solution is working not only for Huawei E1750 USB modem but also for many other devices, as specified here.
Tuesday, July 20, 2010
About Apple's IPhone 4 Antennagate
Everybody on the web seems to talk about Apple's IPhone's so called "antennagate" now. During these days I've collected several links that summarize various facets of this story.
- Antenna-gate timeline
- RIM's official statement after Steve Jobs' July 16 press conference
- Nokia's official statement after Steve Jobs' July 16 press conference
- Samsung's official statement after Steve Jobs's July 16 press conference
- HTC's unofficial response after Steve Jobs' July 16 press conference
- Questions left unanswered by Steve Jobs
- Consumer Reports' criticism over Apple's short-term solution to death grip issue
- A crisis expert's evaluation on Apple's conduct
- How the death grip issue will impact IPhone 4 market according to IDC
Sunday, November 29, 2009
Photo retouching...
The following video shows a technique I used to remove some distracting elements from the original shots of this album.
Sunday, November 22, 2009
How to enable Ruby debug in RubyMine 2.0 on Windows
I recently had the chance to evaluate JetBrains' RubyMine. I was well impressed by this IDE except for the impossibility to debug Ruby code.
However I didn't gave up and, googling a bit, I found a thread inside JetBrains Developer Community that helped me to fix my installation and finally to debug Ruby code inside RubyMine.
Although the entire procedure is fully described in that thread, I think is worth summarizing the fundamental steps to fix the environment.
Let's start from a scenario where Ruby 1.9 has been installed with the one-click installer and RubyMine 2.0 has been installed too. (If you installed Ruby with the zip binary, reinstall it using the one-click installer as found here. That's because currently the ruby debugger ide only works on Windows using a RubyInstaller installation). Also verify that Ruby's root path doesn't include spaces.
- Download Ruby DevKit. (The links brings you to a .7z file, that you can open with 7Zip).
- Open the .7z file and follow the instructions in INSTALL file: basically they said to extract top-level folders (i.e. bin and devkit) to the Ruby's root folder and to modify the contents of fstab file according to your installation. In my case, my Ruby folder was: C:\programmi\ruby19, so my fstab file contents became:
C:\Programmi\Ruby19\devkit\gcc\3.4.5\mingw32 /mingw
C:\Programmi\Ruby19\devkit\msys\1.0.11\usr\local /usr/local - Execute the command gem install ruby-debug-ide19
(Note that's fundamental to install ruby debug ide as ruby-debug-ide19 because RubyMine looks for a gem with name ruby-debug-ide19 and not ruby-debug-ide, as you would expect). Also be patient because the command takes a while to complete. - Open with a text editor the file command.rb that's part of the installed ruby-debug-ide19 gem. In my case, that file was under folder C:\Programmi\Ruby19\lib\ruby\gems\1.9.1\gems\ruby-debug-ide19-0.4.12\lib\ruby-debug
- Modify the beginning of procedure debug_eval (at line 120) so to enter a new statement between statements str = str.to_s and max_time = 10. The new statement to enter is:
return "" if str == "$FILENAME"
At the end, the procedure debug_eval should begin like this:
def debug_eval(str, b = get_binding)
begin str = str.to_s
return "" if str == "$FILENAME"
max_time = 10
to_inspect = str.gsub(/\\n/, "\n") - Save the file
That's it. Enjoy Ruby debugging with RubyMine!
Subscribe to:
Posts (Atom)